How to Fully Uninstall Kaspersky's NDIS Filter
I like Kaspersky anti-virus, and I use it regularly… (Not on my own PC mind you, but on the clients)
While I do believe they provide the best anti-virus in the market, I am not a fan of most of their other products. That goes for the Firewall, Safe Browsing, SSL Hijacking, and of course their newest addition, Secure Connection…

In a previous post, I talked about how to optimize OpenVPN by adjusting the MTU to your links. That however, is likely not going work on windows clients running Kaspersky products.
On these clients, once a packet reaches the MTU, further packets could be dropped. Furthermore, OpenVPN process and the whole tunnel could come to a halt.
Investigating further, it turned out the so called Kaspersky Anti-Virus NDIS 6 Filter is to blame. This NDIS driver seems to be incompatible with any MTU other than 1500.
The solution
The solution is to either disable the NDIS filter for the affecting interfaces (e.g. TAP interface), or completely uninstall it as a whole. Kaspersky’s support page seems to be against disabling the filter and recommends uninstalling it instead:
It is not recommended to use Kaspersky Anti-Virus NDIS Filter by disabling the option in Local Area Connection. That would make NDIS Filter to switch into a specific mode which could destabilize the entire operating system (e.g. cause a BSOD). 1
However, it also points out that if multiple network connections are established,
removal of Kaspersky Anti-Virus NDIS 6 Filter in any connection will not influence efficiency of the interceptor in other connections. 2
What this exactly means is beyond me as uninstalling a driver on any interface, would result in it being uninstalled on all of them (unless of course you disable it instead).
Either way, it is safer to remove the filter altogether. However, do note that removing it will effectively make Kaspersky unable to intercept packets; Which would cripple the functionality of its Firewall, Network Attack Blocker, etc (There seems to be an exception to this on 32-bit systems3).
Other functionalities would not be affected.
Because of the nature of the issue and changes between different versions, different procedures are required for complete removal.
Kaspersky 2016 products and older
In these versions, The filter is directly visible within the NIC Properties. Just select the filter, click Uninstall and then reboot.
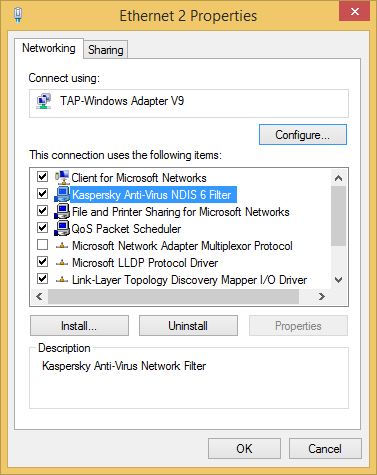
Kaspersky 2017 products and newer
On Windows Vista and later
For reasons beyond me, Kaspersky decided to hide the filter from the NIC Properties list and make it non-removable. To achieve this, all they had to do was a simple change in the inf file. I won’t go into the detail and just leave a Microsoft Link for those interested.
But make no mistake, driver/filter is still very much there!
It amazes me that instead of a proper way for checking whether the said driver is installed or not, Kaspersky’s support page offers some silly and non-reliable methods. They even went the extra mile by claiming:
“In Windows 10, the Kaspersky Anti-Virus NDIS Filter driver is hidden, and it is impossible to check whether it is installed or not."
Well, let us do the impossible ;) by issuing:
C:\Windows\System32\netcfg.exe /q kl_klim6
'kl_klim6' is installed.
There is a proper way to easily (and fully) remove the filter without messing around with the registry:
- Just open the Command Prompt as Administrator and issue the following command:
C:\Windows\System32\netcfg.exe /v /u kl_klim6
You should see something similar to this:
Trying to uninstall kl_klim6 ...
... done.
- And then do a reboot.
This method even works for older Kaspersky products (with visible driver) and could be used in an automated script for removal in a domain.
Windows XP however is an exception as it does not come with netcfg.exe
netcfg.exe in its klim driver folder. DO NOT use that file.
On Windows XP
First thing first: Why on earth are you still using Windows XP?!
Alright, now that that’s out of the way, let us continue…
Since there is no netcfg command in Windows XP (at least not built-in one anyway) I will show you a way to unhide the driver so it can be uninstalled via NIC Properties GUI.
When Kaspersky installs its NDIS Filter, Windows actually uses a somewhat compiled version of it’s settings.
By editing the compiled version, we will be able to unhide the filter:
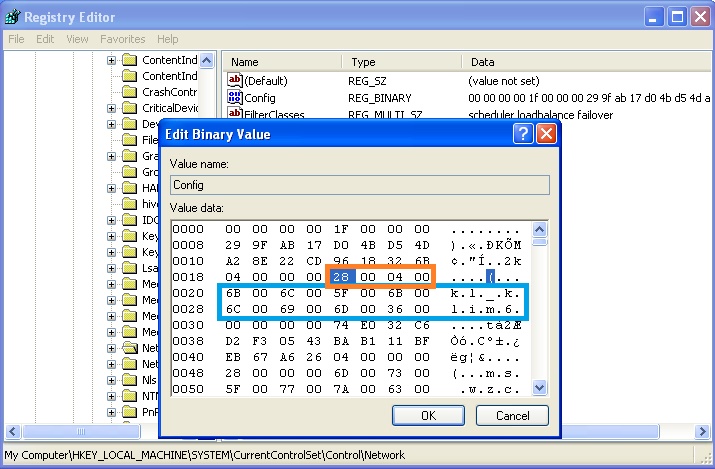
- Open the registry and head to the
HKEY_LOCAL_MACHINE\SYSTEM\CurrentControlSet\Control\Network
double click on theConfig:
-
Now if you look closely, you see the
kl_klim6string, and right before it, there is28 00 04 00(that’s0x40028in reverse order). Just change the byte28to00(so it would become00 00 04 00). And then click OK. -
Open the NIC Propertise again and the driver should now be visible right away!
This method also works for other Windows versions up to Windows 10. I am still unsure where Windows 10 stores in Network Config.
NOTES
-
If you forget to disable the Self-Defense and exit the Kaspersky before removing the filter, The filter still likely will be removed; Removing the
KLIM6service however, would fail. You may want to delete the
HKLM\SYSTEM\CurrentControlSet\services\KLIM6\
subkey afterwards. -
You can install the filter again if needed. Just head to the Kaspersky’s installation folder and load the
klim6.inffile in the NIC Properties GUI. Or you could head to the inf folder and use this command instead:
netcfg /v /l klim6.inf /c s /i kl_klim6