How I lost my data trying to back it up
My data, my precious data… is gone.
Overview
This is a story about how I lost my data when trying to prevent it by backing it up.
Even though there were numerous other factors in play, I take full responsibility for what happened.
I have written this article hoping that it could save someone else from the same situation. No one should ever experience the loss of his/her data.
7 days and 10 hours ago:
Alrighty, It’s time for the offline backup routine again.
When it comes to backing up the full OS, I don’t believe in online backup solutions. This is specially true when I’m dealing with Windows servers. These kinda backups should serve as a disaster recovery solution and I’m not taking any chances.
So I always take them offline, outside of the OS, using a third party program to boot up the servers.
For years I have been using Paragon Software. Their products are great, reliable and I have nothing bad to say about them.
This time however, I thought maybe it’s time to ditch commercial softwares and use the solid ntfs-3g suite instead. Back when I started using Paragon, I didn’t even know what Linux was, but now I consider myself an advanced Linux user. So the switch does make sense.
The most obvious solution for the job, is Clonezilla. Now I admit that I didn’t give it much try before nixing it, but I decided that it really wasn’t necessary for a simple job like this.
All I needed, was to boot up a live Linux environment to mount a remote share and then use ntfsclone to make images of the drives there.
My distro of choice has been Ubuntu for many years so naturally I went with that. Ubuntu supports a full live environment for its desktop image (something that its server images lack for the most part). And I have used Ubuntu desktop live environment quite a lot in the past. It’s rather a nice feeling knowing that you can have a full OS experience without making any permanent changes to the disks.
So the latest Ubuntu desktop LTS image (18.04.1 at the time) it is.
Since I have physical access to this server, using dd to write the ISO into a flash drive should do the job.
And sure enough, within matter of minutes, I was in the Ubuntu live environment.
Let’s do this:
root@ubuntu:~# lsblk --fs

NAME                            FSTYPE              UUID
sda                             ddf_raid_member     LSI     \x80\x86'\xc3
├─sda1                          ddf_raid_member     LSI     \x80\x86'\xc3
├─sda2                          ddf_raid_member     LSI     \x80\x86'\xc3
├─sda3                          ddf_raid_member     LSI     \x80\x86'\xc3
└─ddf1_4c5...a28
  ├─ddf1_4c5...a28p1
  └─ddf1_4c5...a28p2
sdb                             ddf_raid_member     LSI     \x80\x86'\xc3
sdc                             ddf_raid_member     LSI     \x80\x86'\xc3
├─sdc1                          ddf_raid_member     LSI     \x80\x86'\xc3
├─sdc2                          ddf_raid_member     LSI     \x80\x86'\xc3
├─sdc3                          ddf_raid_member     LSI     \x80\x86'\xc3
└─ddf1_4c5...a28
  ├─ddf1_4c5...a28p1
  └─ddf1_4c5...a28p2
sdd                             ddf_raid_member     LSI     \x80\x86'\xc3
Oh, right. This server is using RAID.
hmm…
12 years ago:
Yay! My new server has finally arrived. This is the state of art server with Intel ICH7R chipset. I’m totally going to use RAID with it.
There is an integrated Intel RAID (The Fake RAID kind which I didn’t know much about at the time), as well as an LSI one.
I can switch between the two using a jumper on the motherboard:
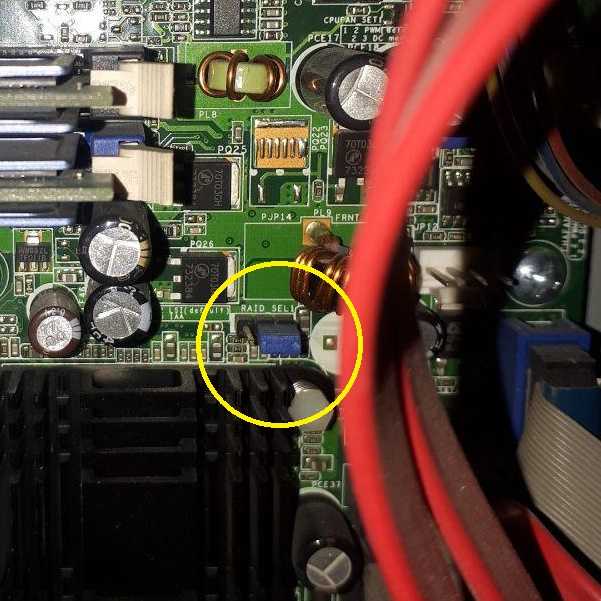
Since I’ll be using RAID 10, lets give each RAID system a try and see which one is better…
Okay. I think I’ll be going with Intel RAID. It looks more advanced. Not to mention that its RAID 10 read time is lower than the LSI’s.
7 days and 9 hours ago:
Lucky for me, Linux has a good support for Intel RAID.
Still… That lsblk output doesn’t seem right. Whats up with that weird UUID? Why its been recognized as ddf raid? Whats up with the partitioning?
Let’s see what mdadm has to say about it:
Command 'mdadm' not found, but can be installed with:

sudo apt install mdadm
Huh, there is no mdadm. It seems Ubuntu desktop 18.04 live, prefers dmraid over it and has loaded that instead.
No big deal though. While Intel recommends using mdadm in place of dmraid, dmraid should still provide the basic functionality required. At least It’s been said so in RST Linux Paper. And hey!, I’m not going to write anything on the drives, just merely having them in /dev/mapper/ would do.
Let’s see what’s going on then:
root@ubuntu:~# dmraid --raid_devices

/dev/sda: "isw" and "ddf1" formats discovered (using ddf1)!
/dev/sdc: "isw" and "ddf1" formats discovered (using ddf1)!
/dev/sdb: "isw" and "ddf1" formats discovered (using ddf1)!
/dev/sdd: "isw" and "ddf1" formats discovered (using ddf1)!
/dev/sda: ddf1, ".ddf1_disks", GROUP, ok, 974608384 sectors, data@ 0
/dev/sdc: ddf1, ".ddf1_disks", GROUP, ok, 974608384 sectors, data@ 0
/dev/sdb: ddf1, ".ddf1_disks", GROUP, ok, 974608384 sectors, data@ 0
/dev/sdd: ddf1, ".ddf1_disks", GROUP, ok, 974608384 sectors, data@ 0
Well that’s new. It seems that 2 different RAID formats have been recognized. I wonder whats the cause of that…
Who knows? Maybe dmraid (or even kernel) somehow was able to spot the inactive LSI chip. These things are complicated you know?…
I’m going to grab a bite to eat and come back to it…
7 days and 7 hours ago:
I bet making dmraid to use isw format would solve the problem:
root@ubuntu:~# dmsetup remove_all
root@ubuntu:~# dmraid --activate n

/dev/sda: "isw" and "ddf1" formats discovered (using ddf1)!
/dev/sdc: "isw" and "ddf1" formats discovered (using ddf1)!
/dev/sdb: "isw" and "ddf1" formats discovered (using ddf1)!
/dev/sdd: "isw" and "ddf1" formats discovered (using ddf1)!
ERROR: ddf1: wrong # of devices in RAID set "ddf1_4c53492020202020808627c3000000004711471100000a28" [4/2] on /dev/sda
ERROR: ddf1: wrong # of devices in RAID set "ddf1_4c53492020202020808627c3000000004711471100000a28" [4/2] on /dev/sdc
ERROR: ddf1: wrong # of devices in RAID set "ddf1_4c53492020202020808627c3000000004711471100000a28" [4/2] on /dev/sdb
ERROR: ddf1: wrong # of devices in RAID set "ddf1_4c53492020202020808627c3000000004711471100000a28" [4/2] on /dev/sdd
ERROR: dos: partition address past end of RAID device
Hmm…
root@ubuntu:~# dmraid --activate y --format isw

RAID set "isw_baghcaahce_RAID 10-0" was activated
RAID set "isw_baghcaahce_RAID 10-1" was activated
RAID set "isw_baghcaahce_RAID 10" was not activated
Okay…
root@ubuntu:~# ll /dev/mapper/

total 0
drwxr-xr-x  2 root root      100 Jan 25 12:53  ./
drwxr-xr-x 20 root root     4460 Jan 25 12:53  ../
crw-------  1 root root  10, 236 Jan 25 11:04  control
brw-rw----  1 root disk 253,   0 Jan 25 12:53 'isw_baghcaahce_RAID\x2010-0'
brw-rw----  1 root disk 253,   1 Jan 25 12:53 'isw_baghcaahce_RAID\x2010-1'
That still doesn’t seem right. Where are my partitions? Why dmraid didn’t activate “isw_baghcaahce_RAID 10”?
Alright, you know what? I’m done for today. I’ll try again tomorrow but this time using mdadm. Yeah, That’ll do the trick.
Lets just reboot the server and load the Windows OS again…
Facing the hard, cold reality
Upon reboot, I was shocked to discover the server was unable to boot. Intel RAID BIOS screen wasn’t giving any error and as long as it was concerned, everything was fine. And yet, I couldn’t boot up Windows.
But how? I was extra careful to not write anything to the drives. How could this happen?
I loaded up Ubuntu again, deactivated dmaraid, mounted my nfs share and made a full sector-by-sector backup of all 4 HDDs. I wasn’t going to take anymore risks.
While the problem was likely not that serious and possibly the result of a corrupted MBR sector or something, it was time to take things more seriously.
On my workstation I loaded up R-Studio, built the array and scanned the drive. I was astonished to see the struggle that it was going through just to find the underlying partitions.
And before long, I came to the realization that most of my data is gone. Just like that.
Still in unbelief, I was left with tears in my eyes, cursing the universe left and right. I had to re-build the array, harvest what I could from the old one and start over.
I came to the conclusions that I needed to get to the bottom of this. I have made a mistake and if I wanted to avoid it in the future, I needed to know what it was.
Getting to the bottom of it
I decided to take things into my own hands and do a little forensic analysis.
Upon further investigation, it turned out a good chunk of all drives had been overwritten (around 200GB of each). They have all shared the exact same 200GB of data. It’s like I had setup a RAID 11 or something. The RAID array was royally f’ed and most of my data was defiantly gone.
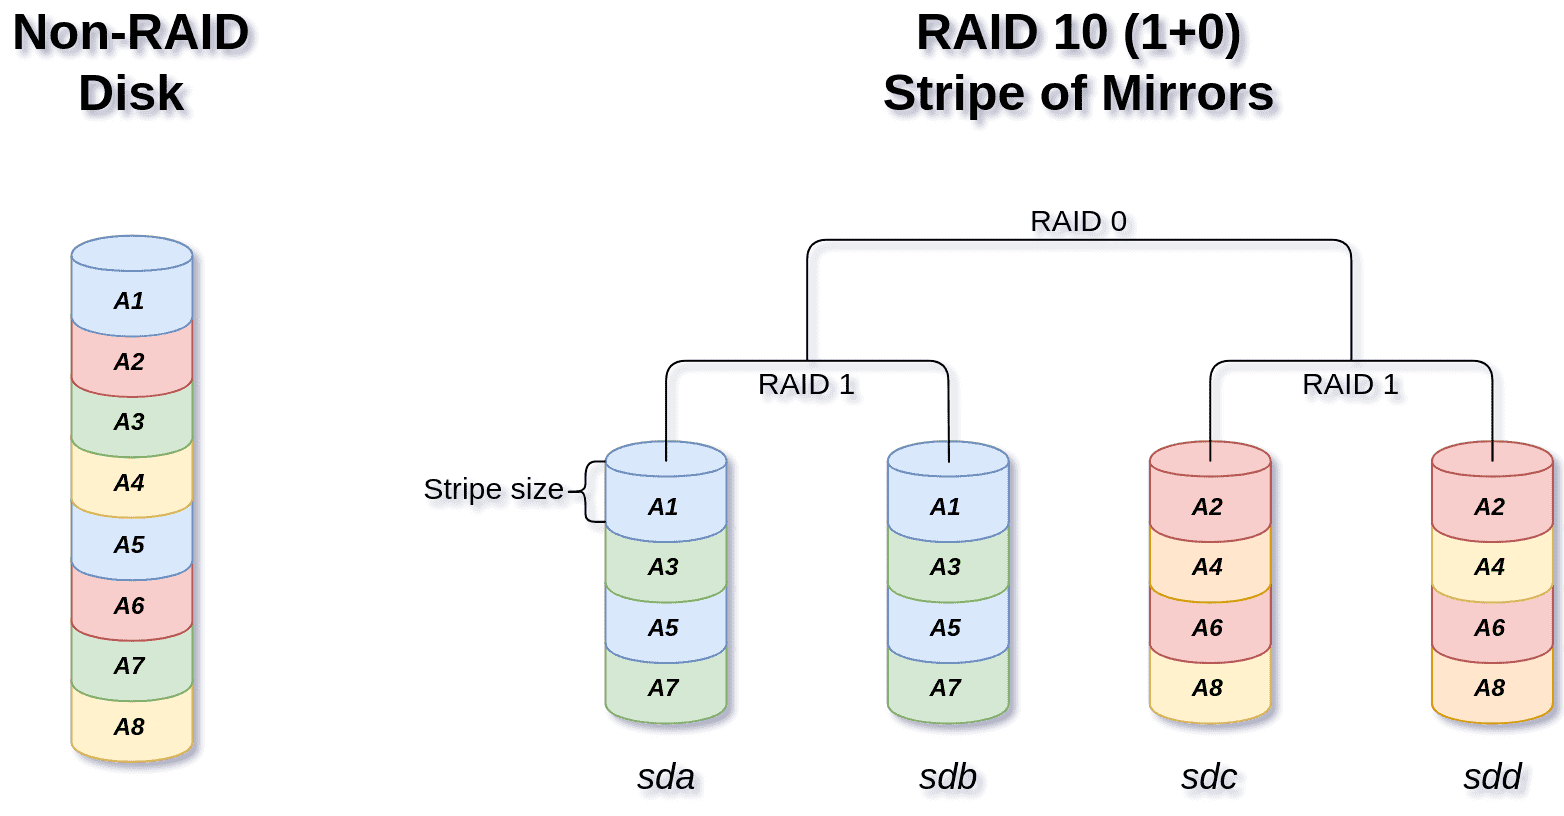
Now before going further, It’s good to have a little understanding of the differences between RAID 10 and RAID 01.
RAID 10 vs RAID 01
RAID 10 is stripe of mirrors:
While RAID 01 is mirror of stripes:
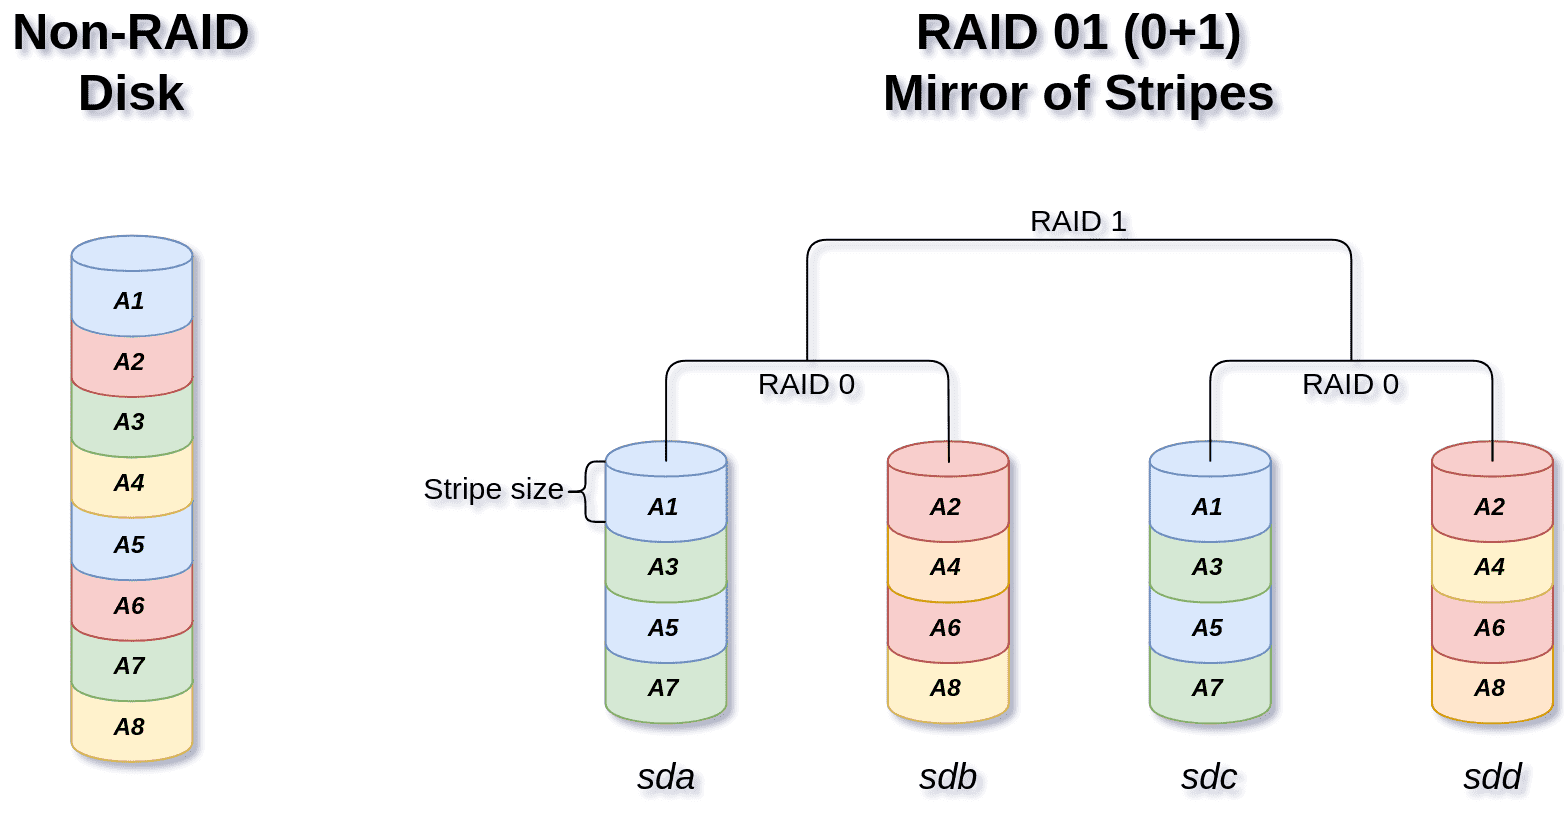
As you can see, there is a fundamental difference between RAID 10 (aka RAID 1+0) and RAID 01 (aka RAID 0+1):
While the first and last members share the same arrangement, the middle ones are swapped.
Intel RST uses RAID 01 (Although adding more to the confusion, they actually advertise it as RAID 10 (0+1)).
The integrated LSI chip in this motherboard, uses RAID 10.
RAID superblocks
But how do software/hardware/fake RAID, know about the RAID format on the drives, their arrangements, etc?
Enter superblock. This is a metadata placed on each RAID member which includes all the necessary information required for the RAID re-assembly. It’s location differ based on the superblock format used.
Linux has couple of well-defined superblock formats which it adheres. The same however, can not be said for commercial software/hardware RAID solutions.
dmraid written by Heinz Mauelshagen, is here to fill this gap. It supports multiple superblock formats from different vendors and can correctly assemble and map the arrays. It can also rebuild the members if deemed necessary.
dmraid is capable of parsing the following metadata:
asr     : Adaptec HostRAID ASR (0,1,10)
ddf1    : SNIA DDF1 (0,1,4,5,linear)
hpt37x  : Highpoint HPT37X (S,0,1,10,01)
hpt45x  : Highpoint HPT45X (S,0,1,10)
isw     : Intel Software RAID (0,1,5,01)
jmicron : JMicron ATARAID (S,0,1)
lsi     : LSI Logic MegaRAID (0,1,10)
nvidia  : NVidia RAID (S,0,1,10,5)
pdc     : Promise FastTrack (S,0,1,10)
sil     : Silicon Image(tm) Medley(tm) (0,1,10)
via     : VIA Software RAID (S,0,1,10)
dos     : DOS partitions on SW RAIDs
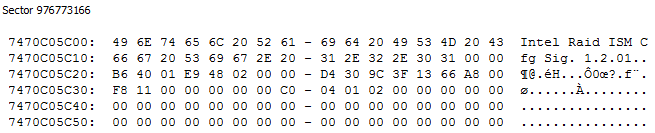
Well, it turns out that the integrated LSI hardware RAID that this server comes with, actually uses the ddf1 metadata format. You’d never see that when its activated (as the LSI hardware RAID would completely mask the underlying members from the OS), but it’s there and if you ever manage to take a look at the very last sector of each member, you’d see something like this:
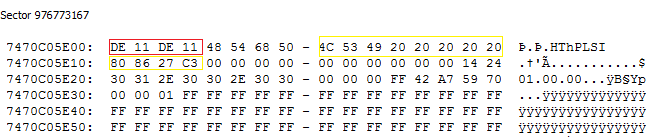
DE11DE11, is the ddf1 superblock magic number. We can also see part of the section of this sector that Linux thought was the UUID.
But… I’m not using LSI… I’m using Intel RST FAKE RAID. Why is that even there?
The sector right before the last one, reveals everything:
This explains why dmraid (and mdadm for that matter), were able to find 2 set of RAID metadata. The location of those superblocks are different and they do not overwrite eachother.
Putting things together
The LSI superblock is the result of me testing it’s RAID 10 functionality more than a decade ago. And I didn’t remove the array that I had just created with it back then, I just simply switched back to Intel RST RAID using the provided jumper, and it soon was forgotten.
By doing so, I effectively set off a time bomb. That single sector stayed around, lurking, waiting for the right moment. Even hard drive failures couldn’t get rid of it (since as soon as they got replaced, the array rebuild process would kick in, replicating it into new ones).
Remember our talk about the difference between RAID 10 and RAID 01? Now imagine what would happen if a software (namely dmraid), incorrectly recognizes a RAID 01 array as RAID 10, and then tries to rebuild it.
This is exactly what happened in this case. After finding 2 different superblocks, dmraid decided that instead of actually asking the user for what to do, it should prefer one over another (in this case ddf1 over isw).
Furthermore, it again decided to automatically rebuild the array and fix the seemingly inconsistency between array members without consulting the user first.
All it took for my RAID set to become invalid and me losing my data, was booting up Ubuntu Desktop 18.04 ISO image.
And that’s it. Nothing else was needed. As soon as dmraid got activated (which it does so automatically in Ubuntu Desktop version), it started rebuilding members of the RAID array to make what it was thought was an inconsistent RAID 10, consistent again. The more I kept that running, the more I lost my data (and it was running for quite a while during my lunch break).
The picture below will roughly demonstrate the state that the RAID members end up to be:
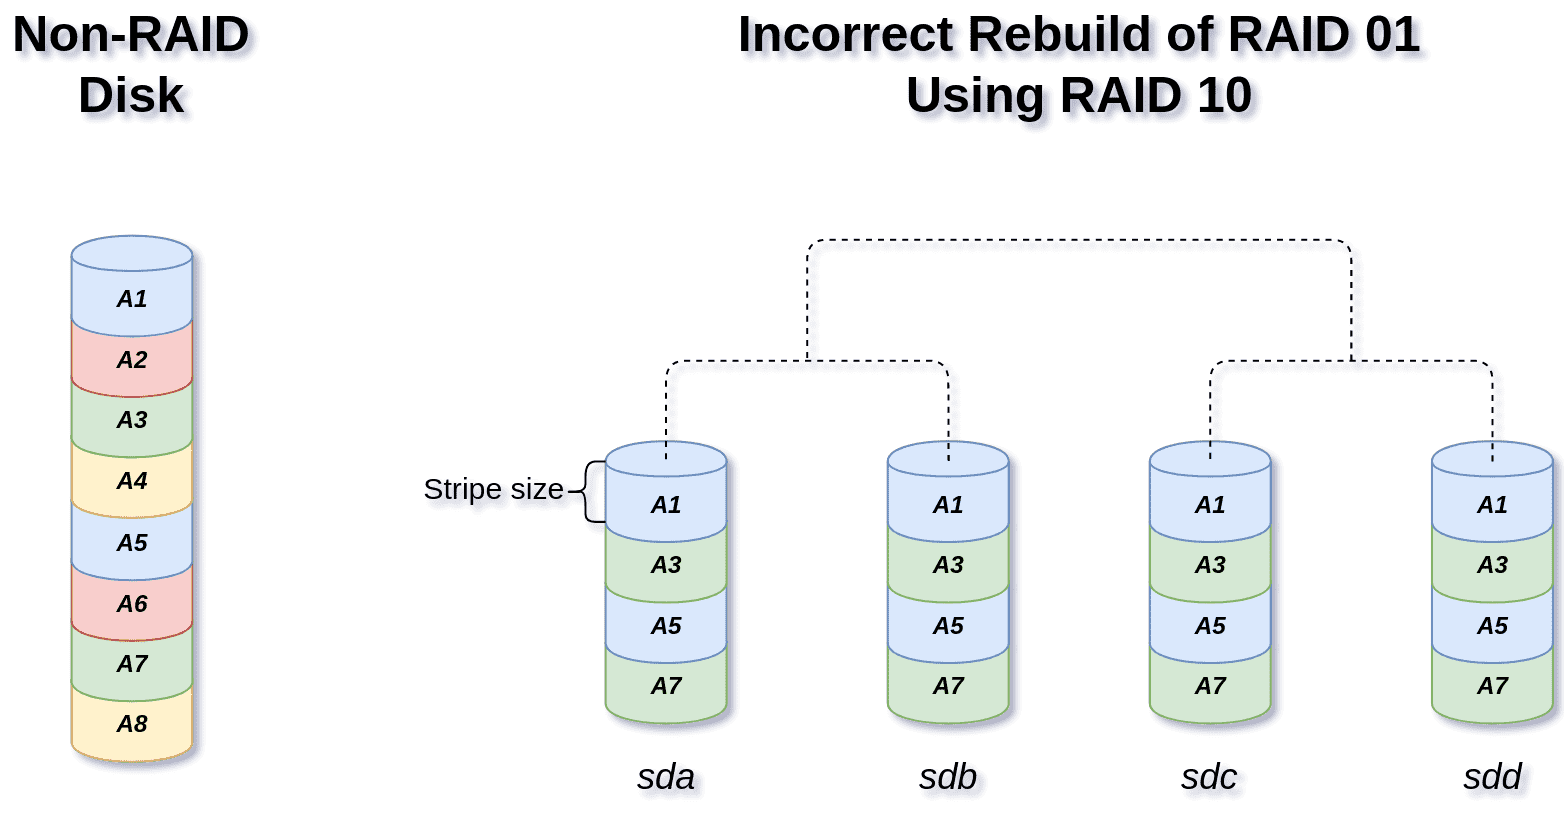
As you can see, for the time that the rebuilding process was in effect, every other stripe is lost and all 4 disks now contain the same incomplete content.
Who’s to blame
As I have mentioned at the start of this post, I take full responsibility for my actions. There were numerous things that I could have done to avoid this rather “stupid catastrophe” or at least fully recover from it.
However, I can not help but to also wonder about other factors in play and how they could have avoided this:
-
I have reasons to believe that mdadm would have been able to handle the situation much better. I still can’t see why Ubuntu decided to go with the old dmraid by default in their desktop version (this is not the case for their server version).
-
When there is even the slightest chance of misbehave, an application (namely dmraid in this case) should not make a decision on users behalf and it must consult the user instead. That goes for preferring
ddf1overiswand then rebuilding the array base on that assumption. -
How hard would it be for a vendor to actually check for the existence of other possible superblocks, warn the user and then potentially delete them before writing its own?
Moral of the story
When all is said and done, I’m still sitting here with a good chunk of my data gone. Sure I have some older backups here and there but they are in no way complete.
One rule that I could take from this experience, is to…
Always secure things with the old methods before trying new ones.
A backup using my old working solution first before trying a new solution, would have given me the ability to fully recover from it.
Another (more specific) lesson that I have learned from this mistake is to…
Always wipe a good chunk of the beginning and the end of each HDD before repurposing it:
dd if=/dev/zero of=$YOUR_DEV count=2048
dd if=/dev/zero of=$YOUR_DEV count=2048 \
  seek=$(( $(blockdev --getsz $YOUR_DEV) - 2048 ))
The last command is taken from here